How to enable OnyxCeph integration with 3Shape Unite
Prerequisites for the integration:
OnyxCeph 3™ Image Integration
- 3Shape Unite 25.1.x or newer.
- OnyxCeph 3.2.240 or newer.
- Unite Cloud must be activated to allow secure data transfer.
- Use the same 3Shape Account to log in to OnyxCeph as the one configured in your 3Shape Unite environment. This ensures proper authentication and data synchronization.
OnyxCeph 3™ Integration
- 3Shape Unite 21.1.x or newer.
- OnyxCeph 3.2.157 (438) or newer.
- Both standalone and client-server setups are supported. See Known Limitations for more information.
The integration between 3Shape Unite and OnyxCeph automates patient management in 3Shape Unite from OnyxCeph, including creating, merging, and updating patients.
Read more about OnyxCeph.
By activating the OnyxCeph 3™ Image Integration feature in Unite, you can transfer both 2D images and 3Shape scans in STL format directly to OnyxCeph.
Supported workflows:
OnyxCeph 3™ Image Integration
- Patient launch from OnyxCeph.
- Automatic patient creation and updates.
- Merge duplicates.
- Extended information transfer (email, notes, phone number, and gender).
- 3Shape Account login.
- 2D scan preview.
- TRIOS scan transfer.
- DX Report (available with TRIOS 6).
OnyxCeph 3™ Integration
- Patient launch from OnyxCeph.
- Automatic patient creation and updates.
- Merge duplicates.
- Basic information transfer (patient name, surname, date of birth, and patient ID).
- 2D scan preview.
How to enable the integration in Unite
Follow the instructions in the related article: How to install "PMS integration" App from Unite Store
How to enable the integration in OnyxCeph
OnyxCeph 3™ Image Integration
Consult the OnyxCeph documentation for detailed instructions. The following steps are provided as an aid to setting up and using the integration in OnyxCeph.
Step 1: Open OnyxCeph.
Step 2: Open Options and select System Options.
Step 3: Select Interfaces, then open Model -i/o -Scanner.
Step 4: Select 3Shape and enable the 3Shape Unite checkbox.
Step 5: Enter the additional settings, including Host and Port.
- Host: Enter the IP address of the computer running 3Shape Unite. Leave this field empty if OnyxCeph and Unite are installed on the same computer.
You can find the Host address on the OnyxCeph 3™ Image Integration settings page in Unite.
- Port: Enter 5492.

Step 6: Send patient information from OnyxCeph to Unite.
Once the integration is enabled, you can send patient data directly from OnyxCeph to 3Shape Unite.
Make sure that a valid phone number is entered in the patient's card in OnyxCeph. If an error occurs during the integration process, review and correct the patient's phone number before proceeding.
To transfer patient information:
- Select the patient profile.
- Open Image Acquisition.
- Click the 3Shape button and select Hand over Master data to transfer the patient details to 3Shape Unite.

Step 7: Authorize the integration.
When you click the 3Shape button for the first time, a sign-in window appears. Sign in using your 3Shape Account. It is preferable to use the account of the administrator of the 3Shape Company configured in 3Shape Unite.

Step 8: After authentication, return to Unite to create a new patient profile or merge and synchronize the patient with existing data.
If a patient profile already exists in Unite, use the Merge patient dialog and confirm the selection.

Step 9: Click Retreive Images to download the 3D images (scans) associated with the patient.

2D images from 3Shape Unite are also accessible in OnyxCeph:

OnyxCeph 3™ Integration
Consult the OnyxCeph documentation for detailed instructions. The following steps are provided as an aid to setting up and using the integration in OnyxCeph.
Step 1: Open OnyxCeph.
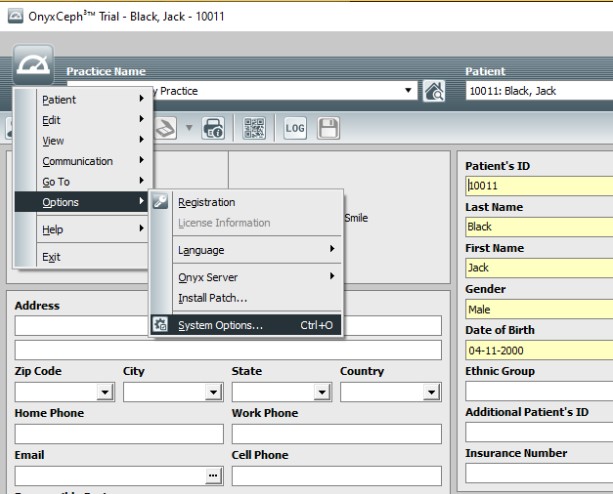
Step 2: Open Options, then select System Options. Alternatively, press Ctrl+O.
Step 3: Select Interfaces.
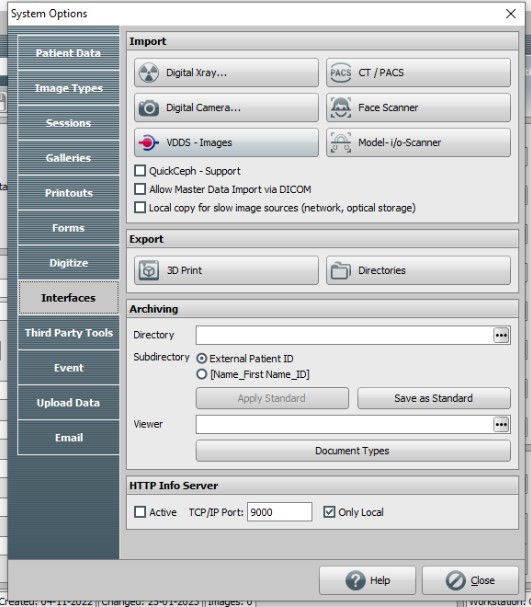
Step 4: Open the VDDS - Images tab.

Step 5: Make sure that all checkboxes in the 3Shape section are selected, then click OK.
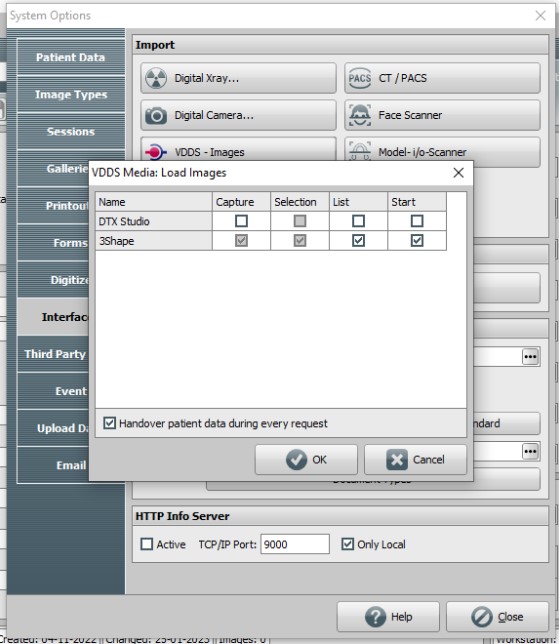
The integration is now set up:
Known limitations
- For information about different PMS and Unite setup options, and integration on TRIOS Move, see Practice management system & Imaging system setup overview
- If your 3Shape Account does not have a license for Practice Management System, the integration will not function. For license compatibility information, see FAQ: Integration of PMS with 3Shape Unite
Contact 3Shape Support if you have further questions.
For full information on correct usage please consult the official Safety and Setup Guide and the most current Manual.