TRIOS Wireless scanner does not connect
All wireless TRIOS scanners
Step 1: Make sure that the TP-Link is connected directly to a port in your PC/Cart/MOVE, not to a USB hub.
We don't recommend using the USB hubs, as they can sometimes interfere with Wireless USB adapters affecting connectivity and speed.
Step 2: Cross check the scanner by changing the USB port for the TP-Link or try a TP-Link from another system if you have one. You can also try connecting the scanner to another PC if available.
Step 3: Check if the scanner serial number is correct. The serial number of the scanner added to the software must be the correct serial number of the scanner you are trying to connect. Find the settings below under the More tab, in the drop down menu select Settings, select TRIOS, and in the drop down menu got go to Scanner Management.
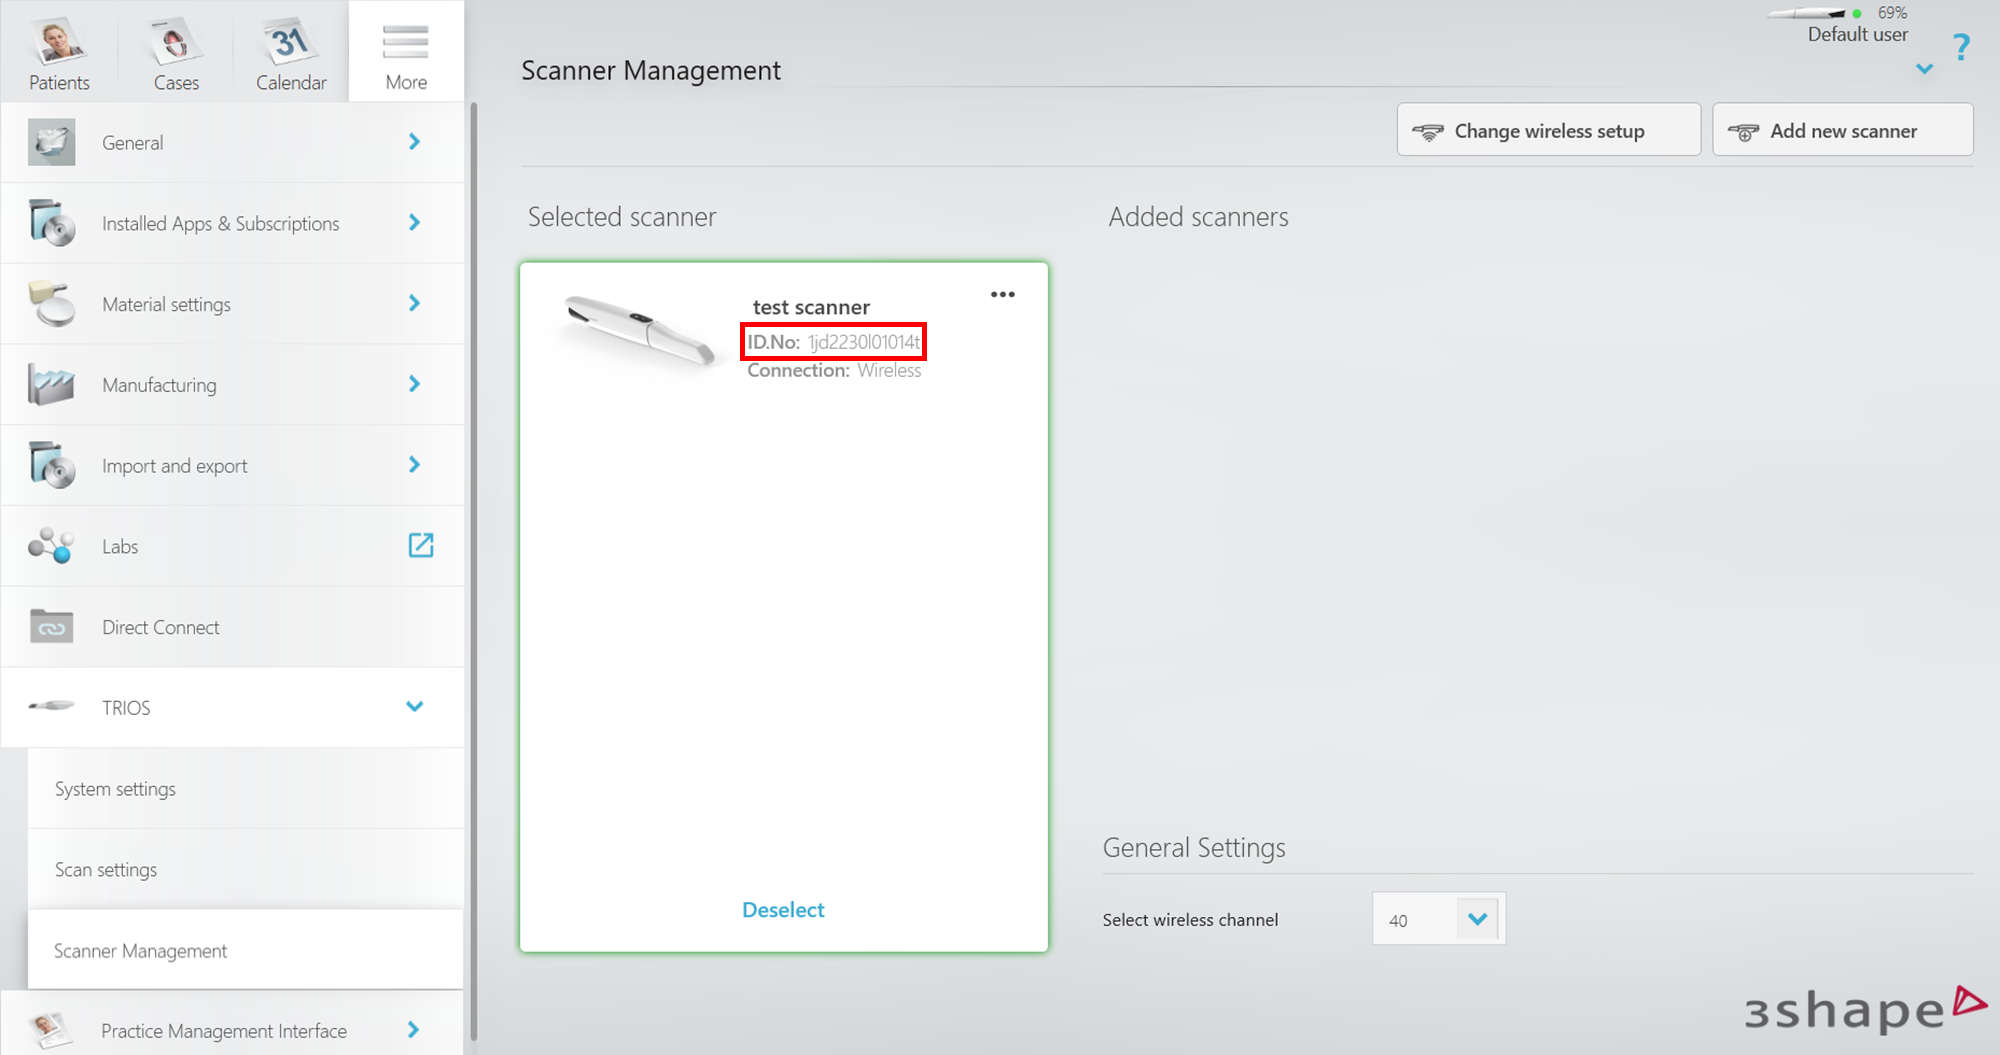
Step 4: Check if the TP-Link is configured correctly. This only applies to older TP-Link adapters currently still supplied with all scanners and MOVE+ units. Newer TP-Link adapters used in the MOVE Pro will have the regular TP-Link name (TP-Link Wireless USB Adapter).
- Open Windows Device Manager by pressing the Windows and R key on your keyboard. In the open field type devmgmt.msc. Next, click OK.

- In the device manager window scroll down to the Network adapters category and open it. In there you should see network adapter 3Shape Wireless USB Adapter (TP-Link).
If the TP-Link adapter has TP-Link Wireless USB Adapter indication try starting Unite as an administrator by right-clicking the 3Shape Unite icon on your Desktop and selecting Run as administrator.
- If the TP-Link still has an incorrect name contact 3Shape Support.
Step 5: Check if the auto-configuration is disabled for the 3Shape Wireless USB Adapter.
- Open Windows Device Manager by pressing the Windows and R key on your keyboard. In the Open field type ncpa.cpl. Next, click OK.

- In the opened Window look for the network adapter which represents the 3Shape Wireless USB Adapter (TP-Link) device, usually called “Wi-Fi” or “Wi-Fi 2”. It should have a "❌" in the icon.

- Open your PC's Wi-Fi connections list. In the drop-down, select the option with the name of the adapter represented by 3Shape Wireless USB Adapter (TP-Link) from the previous step. It should say “No Wi-Fi network found”. If you see a Wi-Fi network list the TP-Link was not configured correctly and you will need to contact 3Shape Support.

Step 6: Check if 3Shape Wireless Service is running
- Open Windows Device Manager by pressing the Windows and R key on your keyboard. In the Open field type services.msc, Next, click OK.

- Find 3Shape Wireless Service and check if the status is Running and set to Automatic under Startup Type.

- If it is not running click it and select Start the service.

- If it is not set to Automatic Startup type; double click it and new window select Automatic in the drop down menu beside the Startup type field. Next, click OK. If the service fails to start contact 3Shape Support.

- Try navigating to http://localhost:8000/3ShapeWirelessService in your browser. If the web page is empty (white, blank) or shows any errors, there could be a compatibility issue with other 3rd-party software or Windows-related issue. Please contact 3Shape Support in this case.
Step 7: Set up the Windows Advanced Firewall Rules by following this guide.
TRIOS 5 & TRIOS 6 Scanners
Step 1: Check the status of the scanner by looking at color of the LED ring. Guide available here.
Step 2: Enable DHCP for the scanner network (advanced). By default the DHCP should be enabled for the scanner network, but in some cases it can become disabled, which may affect the scanner connectivity.
Note: If you often experience scanner disconnections while working via TP-Link and the DHCP keep disabling itself, it could be a Windows related issue. If this is the case, contact your local IT or 3Shape Support.
To check the DHCP status:
- Connect the scanner by selecting it in Scanner Management in 3Shape Unite and wait for the “Turn on the scanner to establish connection” window.
- Open Windows Network Connection by pressing the windows key + R on the keyboard, then type ncpa.cpl in the open field, and finally click OK.
- In the opened Network Connections window find the adapter called ScannerNet and open it's properties by right-clicking it and selecting Properties.

- In the adapter properties window: select Internet Protocol Version 4 (TCP/IPv4), followed by Properties, a new window will open with the IPv4 Properties, select the General tab make sure that both options are set to “Obtain … automatically” (3), if not - set them to enable DHCP → confirm the changes with “OK” button (4).

Step 3: Ensure that the recommended wireless channel is selected for the scanner connection. The default wireless channel is 40 MHz, which can be configured in both Unite and on the Wireless Service page. For TRIOS 5 and TRIOS 6 scanners, use wireless channels within the 36–48 range, as these provide the most reliable signal strength. Channels in the 149–161 range are not recommended because they may result in weaker signal quality and reduced connection stability.
If you experience scanner connectivity issues, try switching to a different wireless channel within the recommended range. In some environments, testing a lower or higher channel may help improve the connection.
To change the Wireless channel in Unite, click on the Scanner icon in the upper right corner. The Scanner Management page will pop up, where ‘Select wireless channel’ option is available.

TRIOS 3 & TRIOS 4 Wireless Scanners
Check whether the LED indicator on the back of the scanner is blue, green or off.
| Indicator state | Description |
|---|---|
| If the indicator is off, this is a hardware issue | Try changing the battery and if it is still off, contact 3Shape Support |
| Indicator is blue and blinking | This means the scanner is attempting to connect |
| Indicator is green | The scanner is properly connected to PC |
TRIOS Share
Requirements
To ensure that your local area network can run TRIOS Share consult with your local IT person to find out if your network meets following the requirements:
The basic TRIOS Share requirements can be found in this article.
The advanced TRIOS Share requirements are the following:
| Communication standard |
|
| Network capacity |
|
| Signal strength |
|
| Bi-directional traffic |
|
| Ports that should be open for communication |
|
| mDNS |
|
| WPA authentication for TRIOS scanners |
|
| Network name (SSID) |
|
| Network settings that should be disabled for the correct TRIOS Share scanner connectivity and operation |
|
Troubleshooting
Issue: Scanner disconnects when scanning
Scanner connection issues are often caused by low wireless signal strength or poor signal quality. To ensure optimal performance, we recommend maintaining a direct line of sight between each scanner and its access point, with as few obstructions as possible. The minimum recommended signal strength is -60 dBm; however, for the best scanning experience and stable connectivity, we recommend maintaining a signal strength of approximately -40 dBm. This helps ensure reliable communication between the scanner and the wireless network and reduces the likelihood of connection interruptions.
To check the signal strength you run the TRIOS Share network Assessment by:
- Connect the scanner via TRIOS Share.
- Navigate to scanner management.
- Click Assess Network Performance on the connected scanner tile. After the test is finished, the full report can be open in your default browser by selecting Download report option. All reports are saved to C:\ProgramData\3Shape\DentalDesktop\ThreeShape.TRIOS\NetworkAssessmentReports (for default install locations).
- The Signal strength can be found under the Wi-Fi section of the report.

Issue: Scanner has a bad connection when moving between rooms
In some situations, a scanner may remain connected to an access point (AP) even when a closer AP with a stronger signal is available. This can result in reduced signal quality and lower network performance. The scanner's roaming behavior works as follows:
- When the scanner powers on, it quickly reconnects to the same SSID and Wi‑Fi frequency that it was last connected to.
- The scanner then begins searching for better access points within the same SSID every 30 seconds.
- If a stronger access point is found, the scanner can roam to that access point automatically.
- When Unite connects to the scanner, roaming is temporarily disabled.
- When Unite disconnects from the scanner, roaming is re-enabled.
As a result, if Unite connects to the scanner before the 30-second roaming interval has elapsed, the scanner may not have an opportunity to switch to a stronger access point.
If you suspect that the scanner is connected to a suboptimal access point force the scanner to roam to a better access point by:
- Deselecting the scanner in Unite.
- Wait at least 40 seconds to allow the scanner to evaluate available access points.
- Reconnect to the scanner in Unite.
This should allow the scanner to roam to a stronger access point if one is available. Once connected to the new access point, the scanner will use it for its next fast reconnect after startup. Therefore, this procedure is typically only necessary when moving the scanner between different access point coverage areas.
Some access points include a feature that automatically disconnects devices when their signal strength falls below a defined threshold. This threshold is often configured around -70 dBm, although the exact value may vary depending on the access point manufacturer and configuration. Enabling this feature can help ensure that scanners disconnect from weak access points and roam more quickly to the nearest access point with a stronger signal.
Contact 3Shape Support if you have any further questions.
For full information on correct usage consult the official Safety and Setup Guide and the most current Manual.